
OpenVPN Integration with GSuite — How ScaleSec does VPN on AWS
How ScaleSec Does VPN on AWS
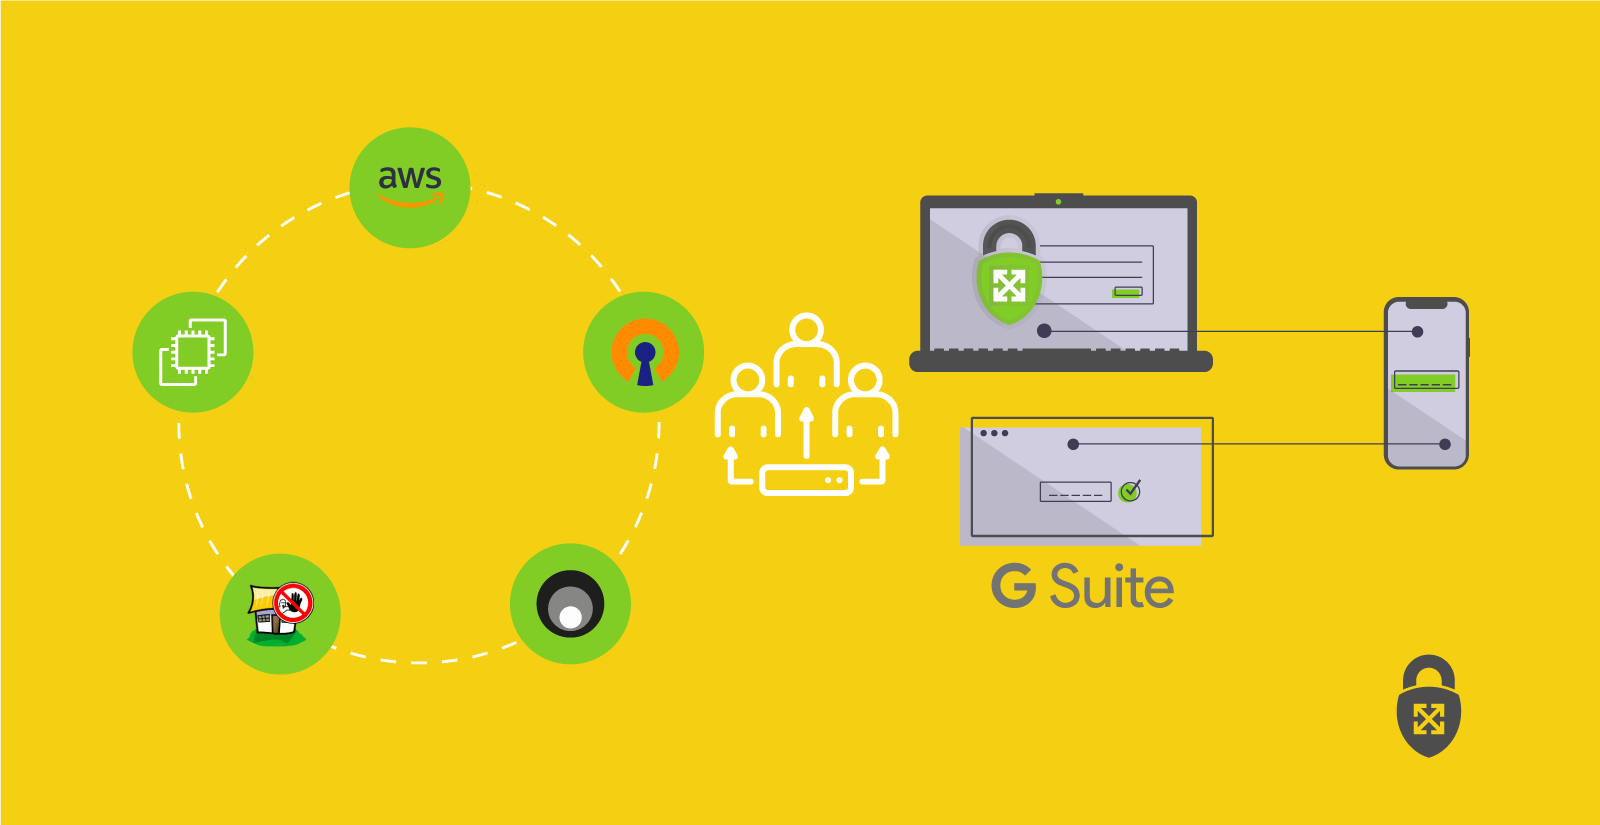
ScaleSec is working from home during the COVID-19 pandemic. To help our employees traverse the internet securely, we offer an easy-to-use Virtual Private Network (VPN) system. Hosting our VPN server solution costs less than $75 a month on AWS, and the software (OpenVPN) is free and open source. It’s been integrated to GSuite, allowing us to simply use our Google usernames and passwords to login. The system is low maintenance and rarely needs to be touched. Originally provided for consultants during travel, this VPN system also works great for working remotely from home. We can connect to the VPN and reach private resources in our AWS VPC and surf through the VPN to the public internet, knowing that our connections are encrypted between home and AWS. All of this is done with free open source software, and a small low cost EC2 instance. This article will explain how we built the ScaleSec OpenVPN system to meet our specific needs, and how a similar approach can be applied to establish a system of your own.
User / Admin Experience
When new employees are onboarded at ScaleSec, they receive a new GSuite account with their laptops. Our internal documentation has easy to follow installation directions for Windows, Mac, Linux, iPhone, and Android setups for OpenVPN clients. In short, they install the client software, then download our OpenVPN config files and add them. When logging in, they use their Gmail username and Gmail password to connect.
On the Admin side, previous OpenVPN servers I’ve worked with required setting up certs for every user’s client. We used a system of scripts to easily create users and send them their individual certs and setup instructions by mail. New employees or developers added to teams would have to follow a process to submit tickets to be added to the VPN, and each time that would require us to run scripts. As team members were rotated off, we would again run scripts to remove them. The system was manually intensive and prone to human error, but it worked, and we had more traffic flowing through that OpenVPN server than any I have seen since.

ScaleSec onboarding with OpenVPN & Google's Secure LDAP
I knew we could trust OpenVPN to scale to meet our needs at ScaleSec, but I did not want us to have to manage VPN users individually. The goal was to have the open source OpenVPN work with our GSuite logins. Google’s Secure LDAP service integration was the solution. This eliminated the need for additional Admin work related to OpenVPN user management.
How It Works
The solution is run in AWS on a single t3a.large instance, which works well for our needs. It is deployed on the latest Amazon Linux 2 AMI and is very cost effective. Since this solution needs a public IP, we also chose to deploy fail2ban, which watches for and blocks bad IPs.
We run two OpenVPN servers on the same EC2 instance. The first one is TCP and hosted on port 443. The second one is UDP and hosted on port 1194. Often egress firewalls will allow TCP traffic out of port 443 for regular https web traffic to work. We have taken advantage of this in our main client profile for tunneling our VPN connections over TCP and out through the commonly open 443 port on the networks we use while traveling. Over the years while traveling, I found that some networks will have TCP re-transmission bug issues when tunneling TCP over TCP. This is why we provide the second UDP connection profile option. Tunneling TCP over UDP avoids rare TCP re-transmission bug issues, and sometimes results in much higher performance (but not all egress firewalls allow UDP out, so we keep TCP as our primary option).
Each of the OpenVPN processes running is configured to use an LDAP plugin. This is where the magic glue comes in. To authenticate to the Google Secure LDAP service, we point the OpenVPN LDAP plugin at a stunnel running on localhost. The stunnel on localhost is configured to build the TLS tunnel using Google’s supplied client certs to the Google secure LDAP endpoint. To OpenVPN’s LDAP plugin it looks like a local LDAP server on localhost, so the plugin works to authenticate over the localhost stunnel setup.

T3a, Fail2Ban, Stunnel, automated on S3
Once all the steps to build the server were worked out, we automated it for our setup with a simple script that can be run on a fresh instance to install and setup everything needed from config backups stored in S3.
“Maintenance is down to about 10 minutes a month, triggered by a calendar reminder to apply Yum updates and manually reboot if needed.”
I prefer to watch the updates, as fail2ban has broken a few times due to config file changes in package updates.
Examples
Setting up a full OpenVPN server is out of scope for this article, but below are some key pieces from our setup that can be used for a similar solution in AWS. In addition to GSuite Enterprise to get Google’s Secure LDAP service, the key open source related configuration pieces you will need for setting this up on your own are included for implementation.
Here is a simple shell script we call on system boot that starts up our setup (similar in reverse to stop). We clear tmp and apply system updates first, then flush iptables and set up the needed forwarding and routing for the IP connection pool before starting both OpenVPN processes and fail2ban.
#!/bin/bash rm -rf /tmp/*
/usr/bin/yum update -y
/usr/bin/sleep 2
iptables -F
iptables -I FORWARD -j ACCEPT
iptables -t nat -I POSTROUTING -s
172.141.0.0/17 -o eth0 -j \ MASQUERADE
/usr/bin/sleep 2
/usr/bin/stunnel /etc/stunnel/google-ldap.conf
&
/usr/bin/sleep 2
/usr/bin/cd /etc/openvpn/; /usr/bin/nohup
/usr/sbin/openvpn \
/etc/openvpn/server-tcp.conf > /tmp/nohup-
tcp.out 2>&1 &
/usr/bin/sleep 2
/usr/bin/cd /etc/openvpn/; /usr/bin/nohup
/usr/sbin/openvpn \
/etc/openvpn/server-udp.conf > /tmp/nohup-udp-
out 2>&1 &
/usr/bin/sleep 2
/usr/bin/fail2ban-server start
The “magic glue” stunnel piece mentioned above is configured in this google-LDAP.conf file, which refers to the ldap-client.key and ldap-client.crt provided by Google when setting up your Secure LDAP service in GSuite:
[ldap]
client = yes
accept = 127.0.0.1:1636
connect = ldap.google.com:636
cert = /etc/openvpn/ldap-client.crt
key = /etc/openvpn/ldap-client.key
Our first OpenVPN process for the TCP connection option calls our server-tcp.conf file which is configured with:
port 443
proto tcp
dev tun
ca /etc/openvpn/easy-rsa-CA/pki/ca.crt
cert /etc/openvpn/easy-rsa-
CA/pki/issued/ssvpn.crt
key /etc/openvpn/easy-rsa/pki/private/ssvpn.key
dh /etc/openvpn/easy-rsa/pki/dh.pem
server 172.141.64.0 255.255.192.0
push “route 172.0.0.0 255.0.0.0”
push “redirect-gateway autolocal”
push “dhcp-option DNS 8.8.8.8”
push “dhcp-option DNS 8.8.4.4”
keepalive 10 120
cipher AES-256-CBC
user openvpn
group openvpn
persist-key
persist-tun
status /tmp/openvpn-status-tcp.log
verb 3
crl-verify /etc/openvpn/crl.pem
plugin /usr/lib64/openvpn/plugin/lib/openvpn-
auth-ldap.so \ /etc/openvpn/ldap.conf verify-
client-cert optional
username-as-common-name
verify-client-cert optional
duplicate-cn
Our second OpenVPN process for the UDP connection option calls our server-udp.conf file which is configured with:
port 1194
proto udp
dev tun
ca /etc/openvpn/easy-rsa-CA/pki/ca.crt
cert /etc/openvpn/easy-rsa-
CA/pki/issued/ssvpn.crt
key /etc/openvpn/easy-rsa/pki/private/ssvpn.key
dh /etc/openvpn/easy-rsa/pki/dh.pem
server 172.141.0.0 255.255.192.0
push “route 172.0.0.0 255.0.0.0”
push “redirect-gateway autolocal”
push “dhcp-option DNS 8.8.8.8”
push “dhcp-option DNS 8.8.4.4”
keepalive 10 120
cipher AES-256-CBC
user openvpn
group openvpn
persist-key
persist-tun
status /tmp/openvpn-status-udp.log
verb 3
crl-verify /etc/openvpn/crl.pem
plugin /usr/lib64/openvpn/plugin/lib/openvpn-
auth-ldap.so \ /etc/openvpn/ldap.conf verify-
client-cert optional
username-as-common-name
verify-client-cert optional
duplicate-cn
Both of these OpenVPN configuration files use the openvpn-auth-ldap plugin with the same LDAP configuration file which points to our local stunnel port:
<LDAP>
URL LDAP://localhost:1636
Timeout 15
</LDAP>
<Authorization>
BaseDN “ou=Users,dc=scalesec,dc=com”
SearchFilter “(uid=%u)”
RequireGroup false
</Authorization>
For all of the above to work in AWS you also need to understand the routing piece for the connection pools. It is important to give the connection pools enough IP addresses to avoid running out if you have a large number of clients. A problem I have faced in the past was related to an OpenVPN server having originally been configured to work with a /24 which was only 256 IPs, but there were over 550 clients. At peak times, when developers were connecting to the VPN to reach the Atlassian suite to do Git commits and trigger build pipeline integrations, some were getting kicked off and it appeared to be random, as other times it was solid. The issue was that the IP connection pool for OpenVPN clients was running out of IPs, and therefore kicking off the oldest connections to make room for new connections. The solution was to use a much larger IP block for the connection pools. A good resource to use when working with IP blocks is RFC 1878.
To avoid connection pool exhaustion issues going forward, it is a good practice to use a much larger block than you think you will ever need. In this setup we use a /17 with 32k IPs. You can see the /17 in the startup script lines for iptables. This /17 matches a route added for the same /17 in AWS console in the VPC routing table that sends that IP block to the network interface of the OpenVPN instance.
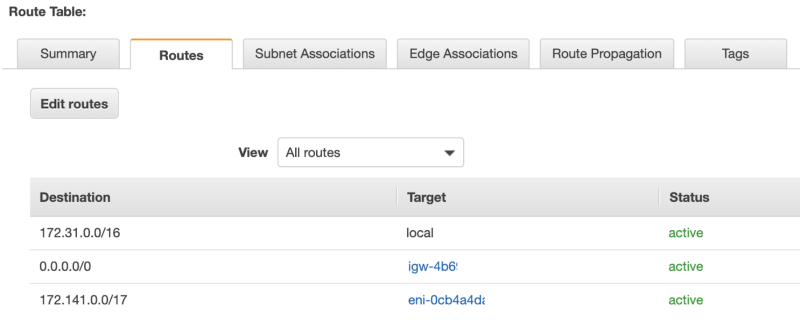
VPC routing table
With the full /17 routed to that instance, and iptables configured to use it, next we break that /17 with 32k IPs down into 2 * /18s each with 16k IPs to use in each pool, which is way more than we need. The unique /18s are then configured for OpenVPN connection pool use in both the TCP and UDP OpenVPN config files. With the routes in place in AWS and our EC2 instance, clients connected to OpenVPN can reach other resources in the AWS VPC that are routable in that VPN route table and get NAT out over the VPN server to the internet.
With everything in place including fail2ban, here is how you can see how many rogue IPs on the internet have discovered our public IP address and recently tried probing our SSH port triggering a block (currently 79 blocked):
# ipset list
Name: f2b-sshd
Type: hash:ip
Revision: 4
Header: family inet hashsize 1024 maxelem 65536
timeout 360000
Size in memory: 23128
References: 1
Number of entries: 79
Performance of our t3a.large EC2 instance over the last hour while connected and writing this article:
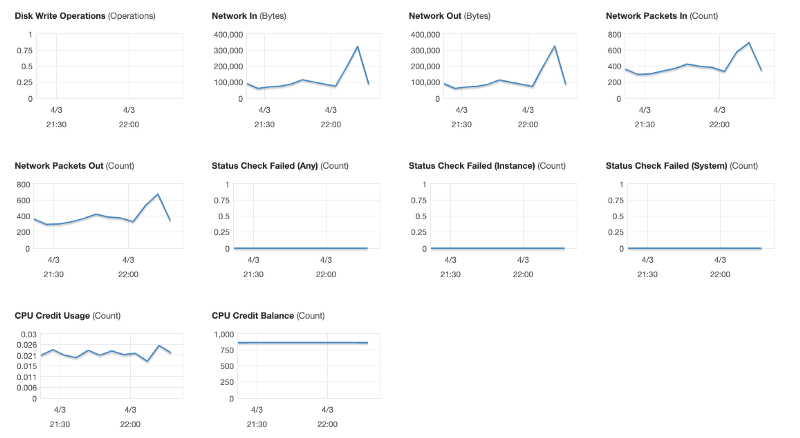
Performance of our t3a.large EC2 instance
At ScaleSec, the use of OpenVPN allows us to connect easily and securely to the internet and our AWS VPC whether we’re working from home or traveling. If you’ve decided to integrate OpenVPN, tell us about your experience on LinkedIn or Twitter.