At ScaleSec, we’ve been following Shielded VM since the announcement at NEXT ’18, when it went GA at NEXT ’19, and through today as it continues to gain steam. We’ve been helping customers understand the value of this great FREE feature you can use to protect your VMs from rootkits and bootkits using advanced Google tech.
With the enormous pile of security priorities today, it’s understandable if you haven’t done a deep dive into Shielded VM and the awesome capabilities it brings. Plus, hardware security is a complex topic. Understanding the depths of the boot process, cryptographic signing, supply chain threats, and firmware attacks can be a lot for an increasingly software-centric security team.
Such hearty topics are generally delegated only to the most dedicated of computer science nerds (we joke; that’s us). In this blog post we are going to give a simple overview of Shielded VM, why it’s important, and then show you what you can do with it!
Titan Chip

Titan Chip
Shielded VM has its roots in the way Google operates its physical hardware in its data centers. All of Google Cloud runs on Google purpose built servers which contain a custom chip, called Titan. According to Google,
“Titan works to ensure that a machine boots from a known good state using verifiable code, and establishes the hardware root of trust for cryptographic operations in our data centers.”
At a high level, the Titan chip’s primary duties are to:
-
Ensure authenticated software components (Secure Boot)
-
Establish a hardware root of trust (Machine Identity)
Lets explore how Titan performs these duties:
Secure Boot
Using public key cryptography (ELI5: some math), the Titan chip validates the boot firmware (the software which controls the physical hardware components) from a known baseline using digital signatures. This ensures nothing at the firmware level has been tampered with and the machine is trusted.
Machine Identity
Cryptographic keys are fused into the Titan chip during its creation. Using these fused keys and cryptography we can ensure the Titan chip is valid, creating a hardware base root of trust with which we can establish a trusted identity from.
For the much more in-depth technical explanation of these concepts, see this blog from Google on Titan.
Shielded VM
Shielded VM extends the above concepts and brings them down to the guest OS Level, protecting end users from threats such as malicious UEFI drivers, boot vulnerabilities, and kernel vulnerabilities. The Shielded VM capabilities can be broken down into three main parts.
Secure Boot
Similar to Secure Boot with Titan, Shielded VM’s Secure Boot helps ensure that the system only runs authentic software by verifying the digital signature of all boot components on each boot.
If Secure Boot is unable to verify the digital signature, or there is not signature at all, the VM instance will show an error state. The VM instance’s serial console log will have an entry containing the strings **UEFI: Failed to load image **and Status: Security Violation, along with a description of the boot option that failed.
Virtual Trusted Platform Module (TPM) Measured Boot
In a blog post about TPMs, Google defines a TPM as
“A TPM is a hardware, firmware, or virtual device that aids in securing machines in several ways: it can generate keys, use them for cryptographic operations (e.g., for symmetric and asymmetric key generation, signing, and decryption), and certify them based on its root Endorsement Key.”
The Shielded VM uses vTPM for Measured Boot, performing the measurements needed to create a known good boot baseline, called the integrity policy baseline. The integrity policy baseline validates that kernel and system drivers have not been tampered with, or rolled back to signed-but-unpatched binaries, or load binaries out of order.
The following diagram provides a visual representation of this measured boot process.
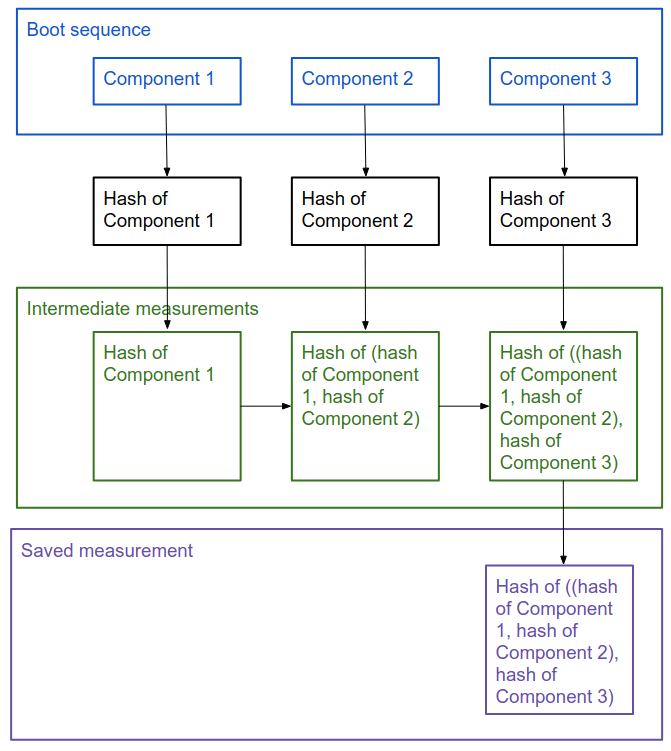
Source: https://cloud.google.com/security/shielded-cloud/shielded-vm#measured-boot
What does Shielded VM protect me against?
Shielded VM can help you protect your system from attack vectors like:
-
Malicious insiders within your organization: malicious insiders within your organization can’t tamper with a guest VM image without those actions being logged. Nor can they alter sensitive crypto operations or easily exfiltrate secrets sealed with vTPM.
-
Guest system firmware via malicious guest firmware, including UEFI drivers.
-
Guest OS through malicious guest-VM kernel or user-mode vulnerabilities.
Shielded VM Demo
Most of the previous material probably sounds great in theory but lets get hands-on and show the power of Shielded VM.
In the following sections we are going to:
-
Deploy infrastructure required for this demo (network, shielded VM instance, stackdriver alerts)
-
SSH into our VM and install some Kernel Drivers
-
Reboot the machine
This demo requires the following prerequisites:
-
The user or service account running terraform must have the following permissions:
-
“Compute Admin” on the project which will host the shielded VM instances
-
“Monitoring Admin” on the Stackdriver Workspace Host Project
Clone the Repository
Clone the following repo and change directory into the new folder. This contains Terraform code to set up the shielded VM and associated stackdriver alerts.
    git clone [https://github.com/ScaleSec/Shielded-VM-Demo.git](https://github.com/ScaleSec/Shielded-VM-Demo.git)
    cd Shielded-VM-Demo
Update the Terraform Variables
In order for Terraform to execute, you need to provide variables for
-
project_id: The project id to provision resources into
-
notification_email_address: An email for stackdriver to send alerts to
-
stackdriver_project_id: The project ID of the stackdriver workspace for this project
-
ssh_cidr_range: The CIDR block to allow SSH access to the GCE instance
To insert these variables, run the following command, replacing the necessary text. The following command will create an *.auto.tfvars in the directory to give terraform the required variables.
    cat > terraform.auto.tfvars <<EOF
    project_id =  {your_project_id}
    notification_email_address = {your_email_address}
    stackdriver_project_id  = {your_stackdriver_project_id}
    ssh_cidr_range = {your_ssh_cidr_range}
    EOF
Configure gcloud credentials
Terraform will use the “application default credentials” by default when provisioning cloud resources. In order to get these credentials, use the following command.
This command will open up a browser for you to log into your Google Account
gcloud auth application-default login
Run Terraform Apply
terraform apply
SSH into the new machine
gcloud compute ssh $(terraform output shielded_vm_instance_name)
Install extra kernel drivers
Instead of installing a rootkit, we’ll install extra kernel drivers. By doing so, we’ve changed the boot sequence and the measurement hashes. Loading these extra drivers will change the cryptographic hash created by the vTPM. Shielded VM’s integrity monitoring feature will notice and log this violation in stackdriver.
Note: You will be prompted to provide a password, provide the password, but we will not use it. The purpose of this password is out of scope for this demo.
    sudo apt-get update && sudo apt-get upgrade
    sudo apt install nvidia-driver-390
    sudo reboot
Receive Stackdriver Alert
When the virtual machine boots up, the Integrity Monitoring feature of Shielded VM notices the hash values of the boot components are not equal and logs this violation to stackdriver.
The stackdriver log is shown below, notice a few things about this log
-
jsonPayload.lateBootReportEvent.policyEvaluationPass = false
-
If you expanded the log and compare the actual hash value to the policy hash value measurements. These values would not be equal, resulting in the integrity failure.
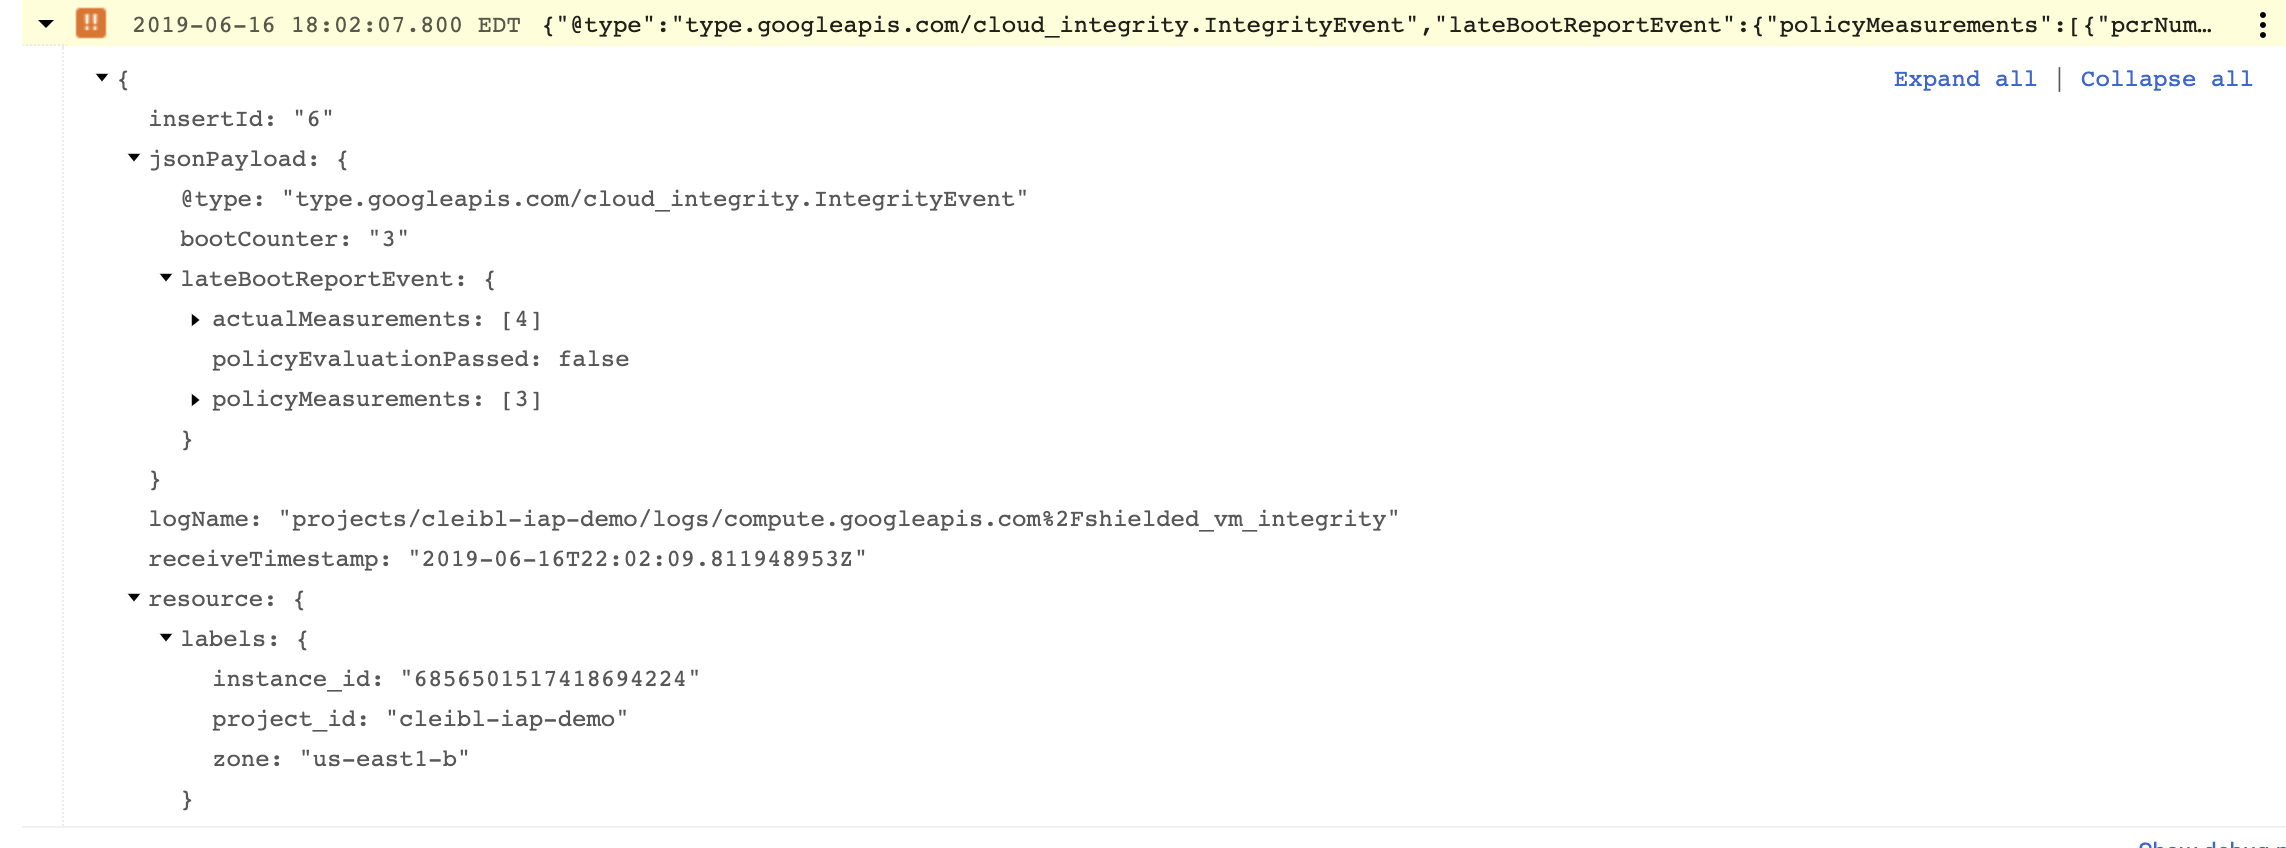
Integrity Event Log in Stackdriver Logging
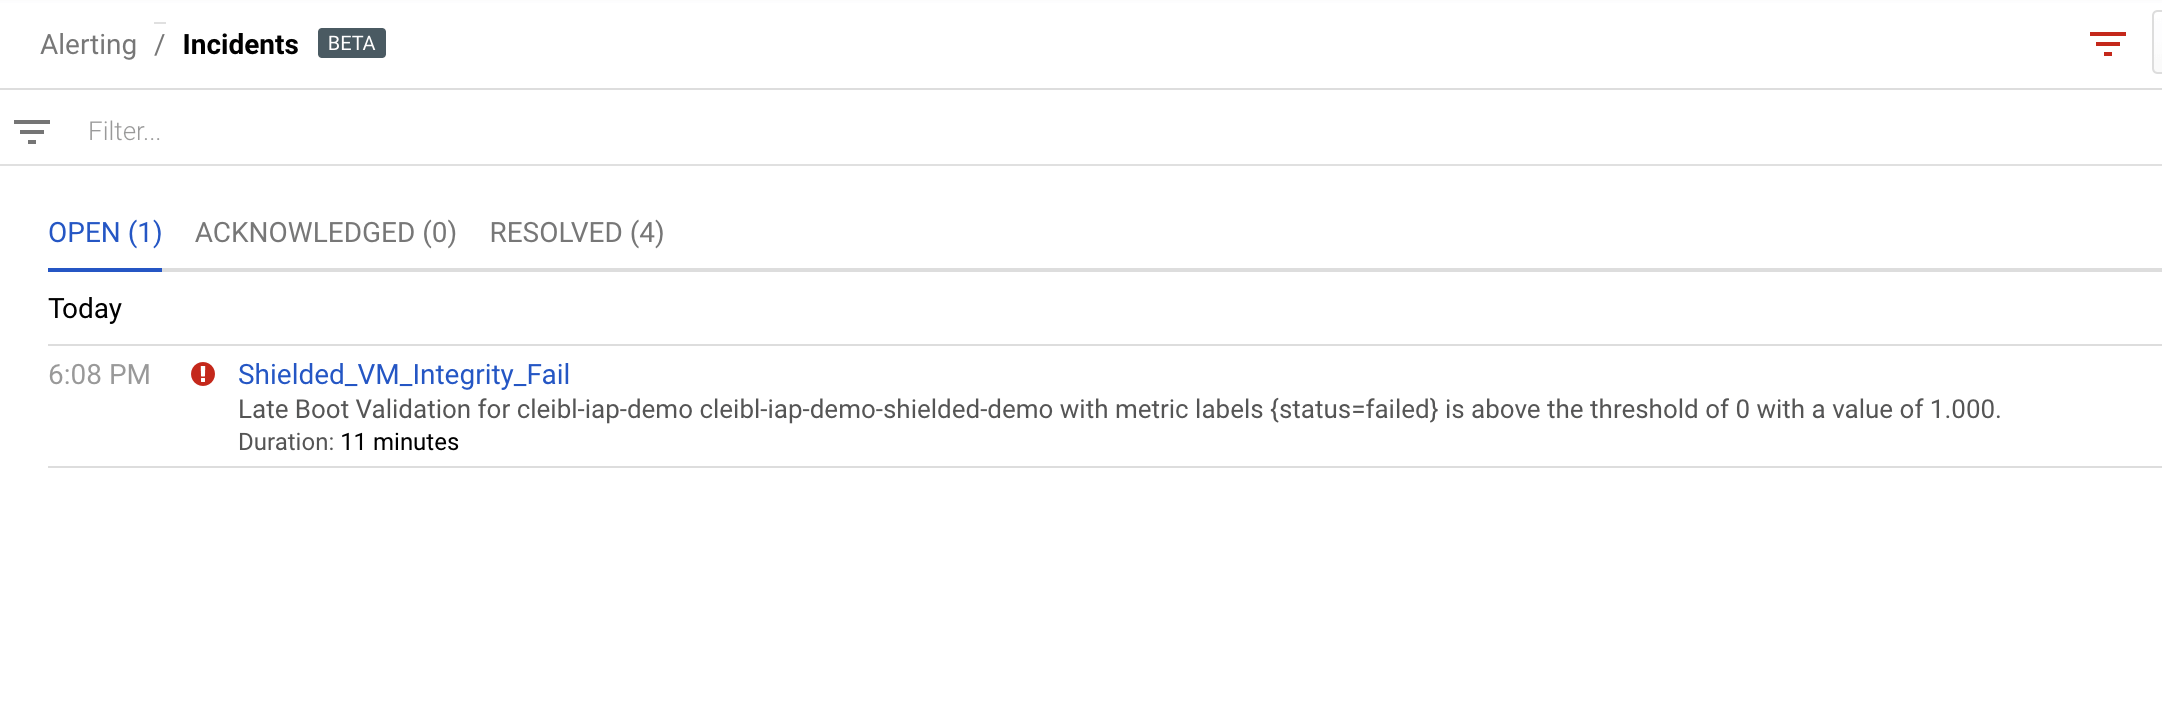
This log matches the stackdriver alert filter setup at the beginning of this demo to notify use when an integrity event occurs.
Destroy Resources
terraform destroy
Conclusion
Integrating Shielded VM into your current environment is simple and can yield vast security benefits quickly. In a future blog post we will show how these ideas can be taken a step further by implementing automated responses to these integrity alerts.